Monday, October 19, 2015

How to rescue a too big shirt

Lately I've been digging around in the basement and finding lots of old clothing that I can refashion into something totally new! I recently found this plaid shirt that was obviously a men's shirt. I really liked the faded look of it though, and wanted it for myself. SO with only 2 quick seams I transformed it into something super cute!

 
I'm using this technique with a button down shirt in this tutorial, but you can also use it on plain pullover shirts too.

 
Measure how much you need to trim and where. I needed about 2 inches at about rib height. Mark on the inside of your shirt. Starting at the bottom corner, free hand a slightly curved line, tapering in, then curve back out to the armpit as in the picture. You can see that I took a little bit of width off the sleeve too.

 
Sew up your line then cut off extra fabric. See the difference?! Repeat on other side and you're done!
 

Wednesday, October 7, 2015

DIY "I'm Late Anway!" Clock

Confession: I'm late to things. A lot. Even if by just a couple minutes. The only times I'm on time is when my brother is with me, because he is ALWAYS early, AT LEAST on time!! I thought this little project was quite fitting for me:

Materials needed:


  • Canvas (I used 8x10)
  • Paints in 2 or more colors
  • Mod Podge
  • Brushes
  • Clock kit (You could just paint on the hands if you don't have a clock kit.)


With a ruler and compass, cut out a hole in the very middle of your canvas. Check you clock kit for the right size. (Mine was 1/2 inch.)


Paint the background of your canvas. This can be just solid color, a design, or a scene. I thought the white rabbit from Alice in Wonderland might be fun. :)


Once your background is dry, paint the words "Whatever, I'm late anyway" In one corner. 


Add the numbers 1-12 in a mish mash order around the rest of the canvas. They can be spread out like mine, heaped in a corner, or in a circle like usual but out of order.


Once the numbers and words are COMPLETELY dry, add a layer of mod podge. 


Once mod podge is dry, assemble your clock kit per directions in kit or paint on your hands. 

Isn't it cute?! I hung mine up right beside our door to give me a smile as I'm rushing out the door...hopefully on time. :)

Tuesday, September 29, 2015

DIY Candy Corn Shirt

 One of the best things about fall (according to my mom! ;) ) is CANDY CORN! Create a cute candy corn shirt easy peasy with this tutorial.

Materials:

  • White t-shirt
  • Acrylic or Poster paint
  • Large metal or glass bowl (A plastic one may stain.)


Add 1/2 cup of yellow paint to 4 cups of water in your bowl and stir well.


Soak 2/3 of your shirt in the paint mixture for 15 minutes.

'
Wring out the excess paint.


Add 1/2 cup of orange paint to 4 cups of water and mix well. Soak the lower 1/3 of your shirt for 15 minutes.


Tada!! Lay out your shirt to dry for an hour or two on a non-stainable surface.


                                                               Dry on high heat to seal in the color.
                                                                   Wash for the first time by itself.


The orange faded on my shirt because I didn't mix the paint and water enough. I wouldn't wash it often or the colors will fade. HAVE FUN! 

Wednesday, September 23, 2015

First Day of Fall Project

It's officially FALL!! I thought it would be fitting to post this tutorial on how to make pumpkin puree from your own homegrown pumpkins. This pumpkin is my first pumpkin EVER from my own garden! (I have a slight obsession with pumpkins, so this is very exciting for me! :) )


(Isn't it beautiful?!) Cut the stem off and cut in half.


Scoop out the seeds and innards of the pumpkin. (My chickens will have a heyday tonight!!)


Cut a half circle shape on either end of the pumpkin and poke a couple holes in it.


Place upside down on a foil-lined baking sheet.


Bake at 350*F for 1 hour. 


The skin should be golden brown. 


See the syrup oozing out? Mmmmm.


Let it cool.


The skin should peel off easily. If not, scoop out the pumpkin with a spoon.


Place in a blender...


...and puree it. 


Tada! Lovely orange homemade pumpkin puree! Use it in place of canned pumpkin in any recipe. 

Make sure to puree it very well, especially if it is going to be used for pumpkin pie. Once someone has had stringy homemade pumpkin anything, for some reason they are very hesitant to try it again!! 

Monday, September 21, 2015

No Sew, 5 Minute Fall Fashion!

I'm back with another fall fashion idea! This time, however, it is not about refashioning - it's a no sew project that only takes 1 yard of fabric!! How cool is that!?

Materials:

  • 1 yard of fleece 
  • scissors
  • belt

Lay out your fleece and fold it in half.


Mark where you want your neckline to be and cut it out. 


Put your to-be-shirt on and mark how high or low you want your waistline to be. Cut 2 slits 12 inches from the sides. Repeat on the back and you are done! 


Add a belt and boots and you're lookin' good! You could hem the sides and or neckline if you wanted, but if you have a no-fray fabric then you'll be fine. 


Monday, September 14, 2015

Easy Sweater Refashion

Here is another easy sweater refashion! This sweater was very comfortable and my favorite color, but I didn't like the style. I fixed it up very easy and quickly.

Materials needed:

  • Old Sweater
  • 2"x 8" strip of fabric x2
  • 2 buttons


Before picture!

Cut out desired neckline (Scoop, v-neck, ect.) and hem. 
Hem 2 long sides and 1 short side of your strip of fabric. Starting 1 inch from the end, fold corner to the inner edge of the hem on the other side like shown:


Keeping that corner down, fold other corner to the edge so that you make a point on one end of the fabric. Sew down.


Right side and wrong side of the two strips of fabric. Cut a buttonhole near the point of each one.


Fold the cuff of your sweater up twice and insert your strip wrong side up. Position it so you can fold it up and button it right above the cuff. Hand sew in place. Add a button, repeat on other sleeve, and you're done!


Hasta la vista! 


Tuesday, September 8, 2015

Old Sweater Refashion

I can't wait for fall. Sweaters and hot cocoa, crisp mornings, beautiful colors. Unfortunately, I still have at a whole week to wait! :) However, it's not too soon to start fall clothing shopping, or, refashioning! I have a couple sweaters from last year that will need some help in order to be wearable. I started today with a sweater that is a gorgeous color, but the neckline said, "old". Of course, I forgot to take a before picture!

Materials:
  • Old sweater
  • Your choice of fabric measuring 12" X 40"


Finished product!


Start by cutting a v-neck into the front of the sweater. (Make sure it's ONLY the front. I accidently cut through both layers but managed to save it!) 


Gather the 2 short edges and 1 long edge of your fabric. Hem the other long edge.


Pin your fabric to your sweater right sides facing. Start by matching 1 short edge to the V of the 
v-neck, leaving about 4 inches of sweater from the shoulder as pictured. Make sure the hemmed edge is facing up.


Once it is all pinned, sew!


Bring the short edge that is has not been sewn down to the 4" of sweater left. Sew together, right sides together.


Now, there will be a V where the fabric is not yet connected. Measure 5" from the center of the V and pin, right sides together. Sew and you're done! 


Wednesday, May 20, 2015

Art Project Picture Tutorial!


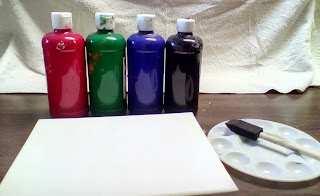
I've been thinking of doing this project for awhile, and finally felt crafty enough to do it. This is what you'll need:


  • Canvas of any size (I used 8x10) :
  • Paint of your color choice
  • Sponge brush
  • Paint pallet
  • 2 short nails
  • Hammer
  • Craft wire (Somewhat sturdy)
  • Construction paper, color of your choice
  • Black and white sharpies/gel pens
  • Optional: mod podge


Gather whatever color paints you would like. I wanted a deeper, blueish-midnight color scheme. Feel free to do other colors. It would be fun to do a lighter blue background, or other bright and cheery colors. 

I mixed my colors for a deep blue, blue-green, and dark purple. (Pay no attention to the red blob in the middle...it just kinda blupped out of the bottle. :p)

Using a spongebrush, lay the colors onto your canvas. (You cold use paper, but I think the canvas gives it good texture and they aren't that expensive. You can find them at your local craft store.) I meant to take pictures as I went to show you but I got too into it and forgot. :) Paint them in kind of a camoflauge-like pattern. I then ran my brush over everything to mix all the colors in. 


Using your finger, paint a white (or other color) border around your background. This helps it stand out. If you would like, put a layer of mod-podge over everything to help seal in the color and give it a matte finish.


Twist your craft wire around itself so it looks like the above. You'll need a length as long as your canvas.  Secure to the canvas frame with nails.


Paint 3 clothespins your desired color. 


Cut out three bird shapes out of construcion paper and detail them, giving them an eye, beak, wing and tail. Again, you can use whatever color paper.


Clip the birds to the wire, write a Bible verse or saying if you would like, and you're done!